How to Scan Documents With Your Phone for an Online Form
No scanner? Photograph your papers, turn them into one PDF, and meet the page size, file size and page order rules that decide whether an online form accepts your upload.
 Noman Mustafa Owner
- Published
- Reviewed byMuhammad Ijaz
- Reading time8 min
On this page 25 sections
The form wants your certificates as one PDF. You have no scanner, and the shop is shut.
Your phone is enough. This guide shows how to scan documents with your phone for an online form: photograph each page, turn the photos into a single PDF, and set the page size the form asked for.
It takes about five minutes. The fiddly part is not the scanning. It is meeting the rules the form sets, so most of this guide is about those.
How to scan documents with your phone, step by step
Six steps. Do the first one before you touch your camera, because it saves redoing the rest.
Write down what the form asks for. Note the page size, the biggest file size in MB, whether it wants one file or several, and any naming rule. These are usually in small print next to the upload box.
Photograph each page flat. Put the paper on a table in good light. Hold the phone directly above, not at an angle, and let the page fill the screen. A tilted photo gives you a slanted page that looks careless.
Add the photos in order. Open JPG to PDF, click Choose files, and drag the rows into the right order. JPG, PNG and iPhone HEIC all work, so there is no need to convert anything first.
Set the page size to A4. Use Letter if you are in the US or Canada. Leave Orientation on Auto so a landscape page does not get shrunk onto a portrait one. Pick a Small margin for anything that will be printed.
Tick the options you need. Sort files by name before combining is useful for a big stack, since your camera names photos in order. Add a page number to each page helps an office keep a long scan straight.
Press Create PDF, then open it. It usually takes 3 to 8 seconds. Read every page before you upload it, and check the file size against the limit from step one.
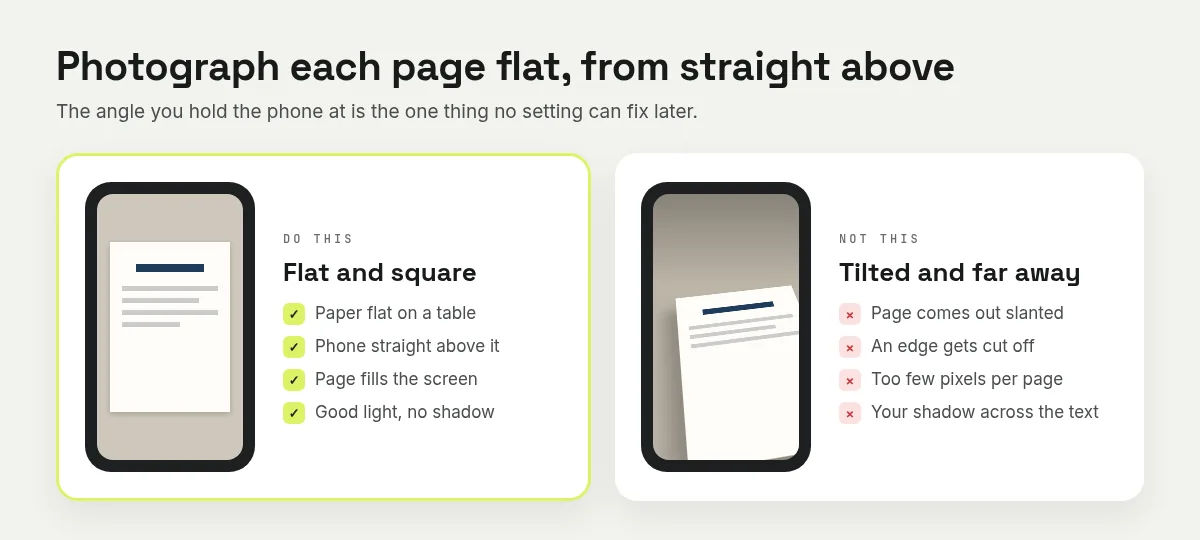
Leave a thin border of table around the paper, so no edge gets cut off.
Without an account you can add 3 images at a time, or 10 with a free account. For a bigger stack, do it in rounds and join the results with Merge PDF.
Which settings to pick, and when
Six settings decide how your PDF turns out. Here is what each one is for.
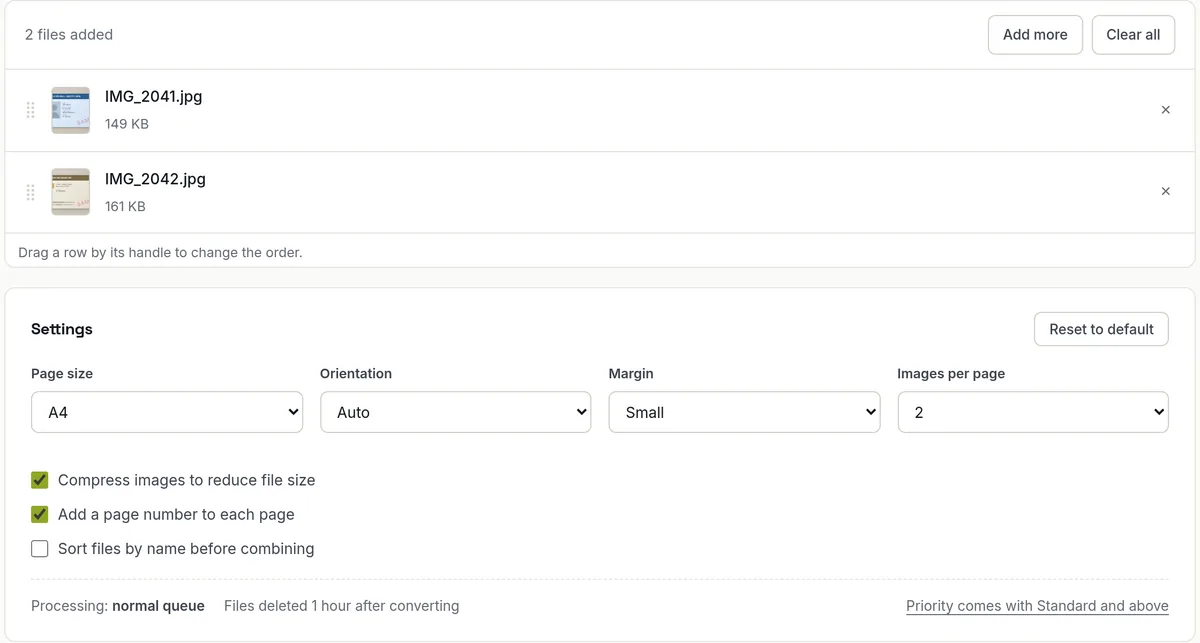
The real settings panel, set up for both sides of an ID card.
Setting | Pick this | Why |
|---|---|---|
Page size | A4 for most of the world, Letter in the US and Canada | Forms and printers expect a standard page |
Page size, on screen only | Fit to image | Each page becomes the exact shape of its photo, with no white space |
Orientation | Auto | The page turns to match the photo, so landscape pages stay readable |
Margin | Small or Medium for printing, None for screen | A border stops text being trimmed at the edge |
Images per page | 1 normally, 2 or 4 for ID cards and receipts | Fewer pages means a smaller file |
Compress images | On to email or upload it, off for a signed form you will print | This is the quality and size trade |
The one people get wrong is page size. A4 puts every photo on a standard page and leaves white space where the shapes do not match. Fit to image gives pages of different sizes, one photo on each, which looks neat on a screen and odd when printed. Images per page works with A4 and Letter.
If the form says nothing about page size, choose A4. It is the safe answer almost everywhere.
Settings for what you are actually sending
Whichever online form you scan documents for, the six steps stay the same. Only a setting or two changes.
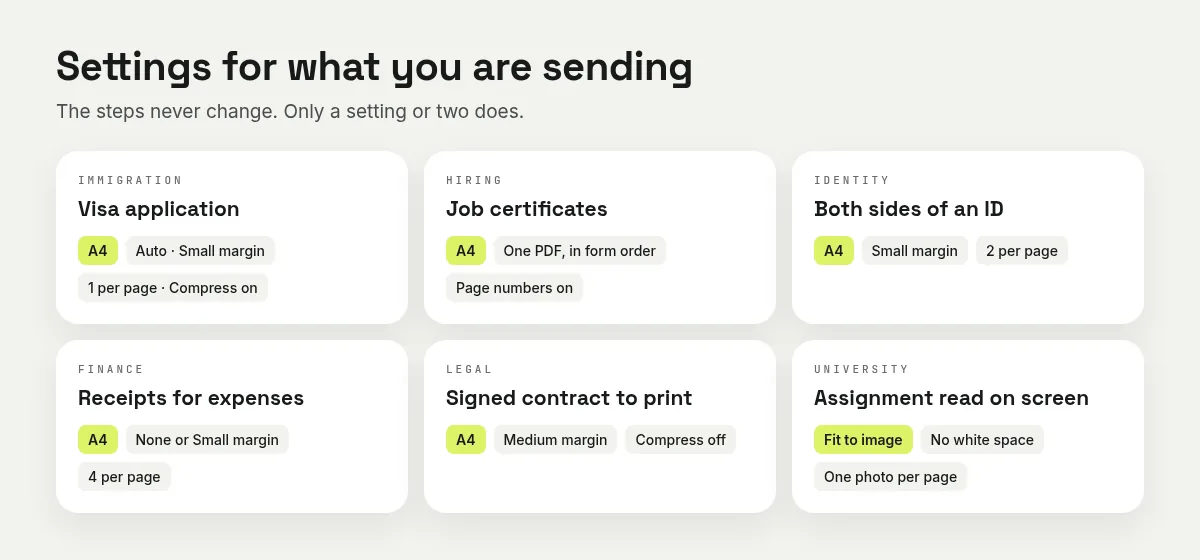
Not sure? A4, Auto and a Small margin suit almost any form.
A visa application document upload
Use A4, Auto, a small margin, and one image per page. Keep compression on unless the form says high resolution, because these portals usually cap the file at a few MB. Name the file the way they ask, such as passport_firstname.pdf, and check whether they want one combined file or a separate one per document.
Scan certificates for a job application
One PDF, in the order listed on the form, with page numbers on. Degree first, then transcripts, then experience letters. An employer who has to hunt for page three will not hunt for long.
How to scan both sides of an ID card
Set Images per page to 2. Front and back land on one page, which is what nearly every office wants, and it halves the page count. For four small cards or receipts, use 4 per page.
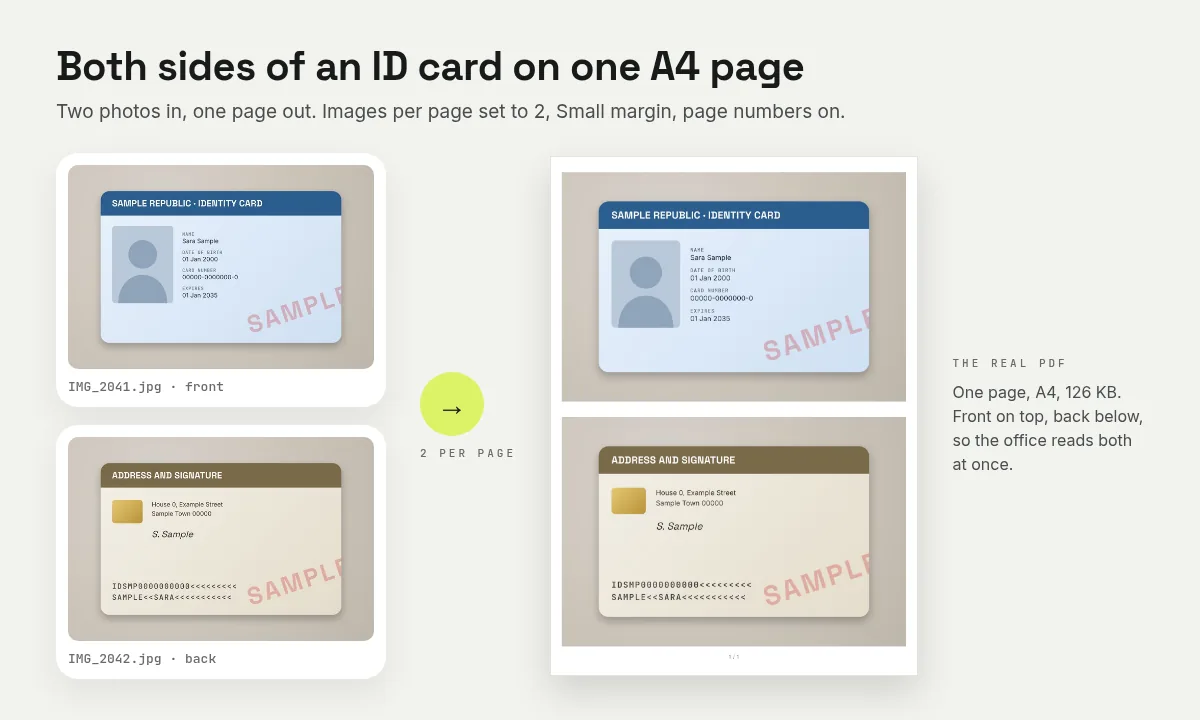
A real result from the tool, made with a sample card. Never use your real ID for a test.
Scan receipts for an expense claim
Photograph each one flat, then use 4 images per page. Twelve receipts become three pages instead of twelve, and finance can read them all at a glance.
A signed contract you will print
Turn compression off here. The detail in a signature matters, and the larger file is worth it. Choose A4 with a medium margin so nothing is clipped at the edge when it prints.
A university assignment with photos of work
Fit to image looks better if it will only ever be read on a screen. Use A4 if it has to be printed or marked on paper.
How to make a PDF of multiple photos
Upload all the photos together, drag them into the order you want, and press Create PDF. Each photo becomes one page, or shares a page when you set Images per page to 2 or 4.
Got a long stack from your camera roll? Tick Sort files by name before combining. Phones name photos in the order you took them, and the sort reads numbers properly, so IMG_2 comes before IMG_10.
Is it free, and is it safe to upload my documents?
Yes to both. Here are the real numbers rather than a promise.
Is it free?
You get 20 credits a day with no account, no email address and no card. One image costs 1 credit, so that is 20 images a day at no cost. There is no watermark on the PDF.
Signed out you can add 3 images at a time, each up to 25 MB. A free account takes 10 at a time, 100 MB per file, and 50 credits a day. Paid plans take bigger batches.
Do I need to install an app?
No. It runs in any phone or computer browser, on Android, iPhone, Windows, macOS and Linux. For a job you do a few times a year, that beats a download and an account.
What happens to my documents?
They are deleted from the servers one hour after processing, automatically. Nothing is read or reused. Every upload and download runs over HTTPS.
This matters more here than on most tools. People put ID cards, bank letters and signed contracts through a converter. Check the deletion policy on any site before you upload papers like those.
Does my phone need to be online?
Yes, since the file is converted on a server. Take the photos whenever you like, then convert when you have a connection.
The five rules that decide if your upload is accepted
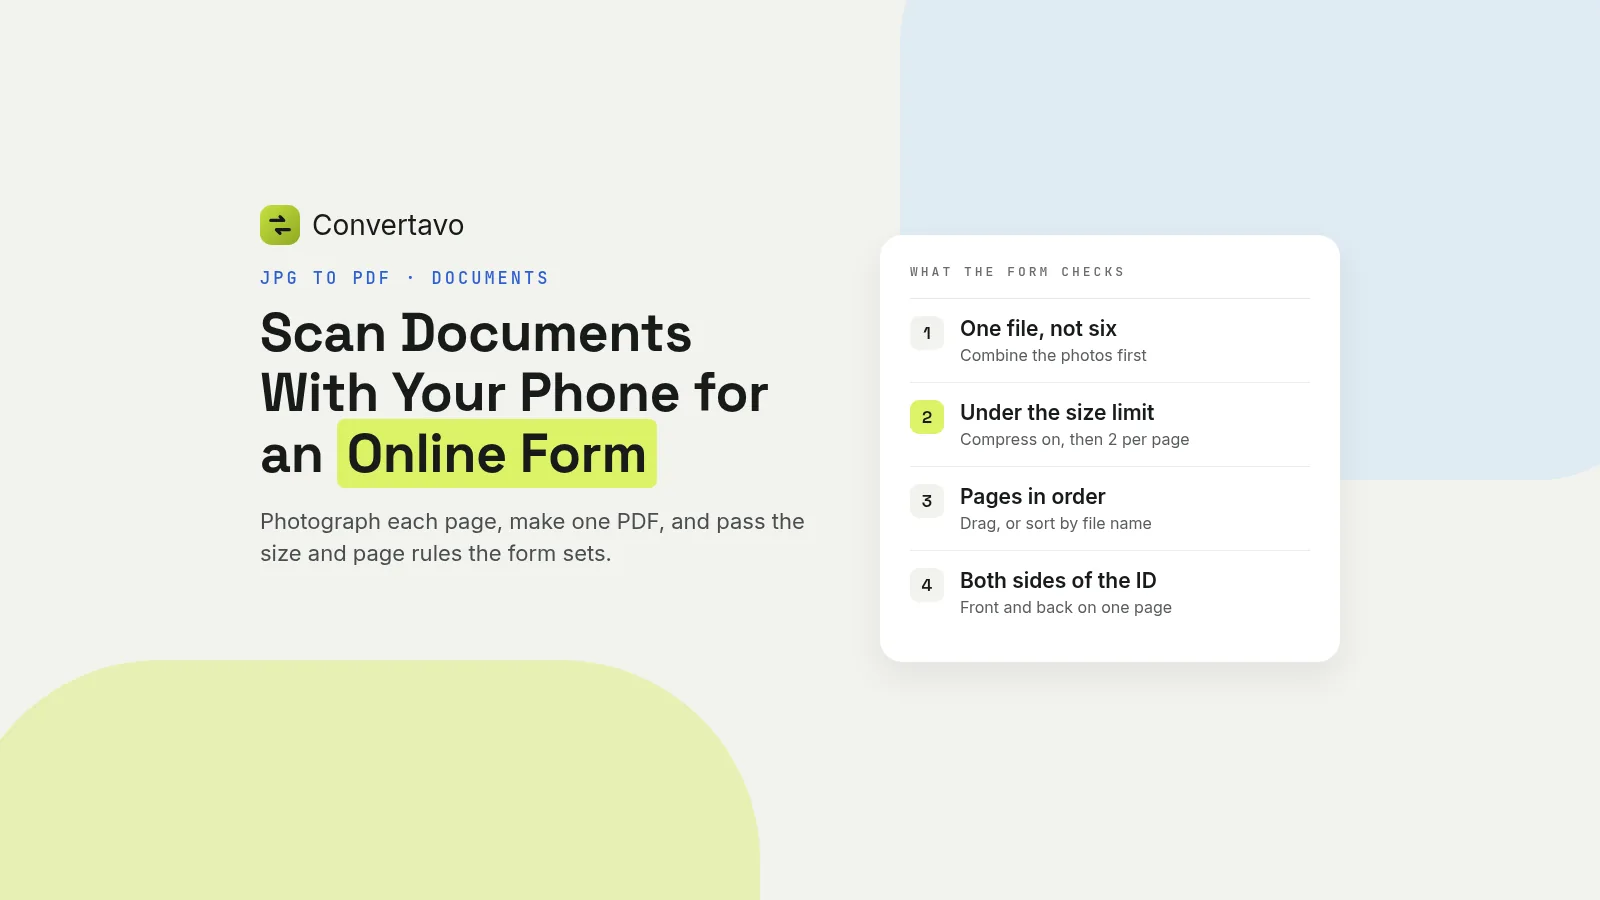
Forms reject files for boring reasons, not for quality. When you scan documents for an online form, these are the five that catch people out, in this order.
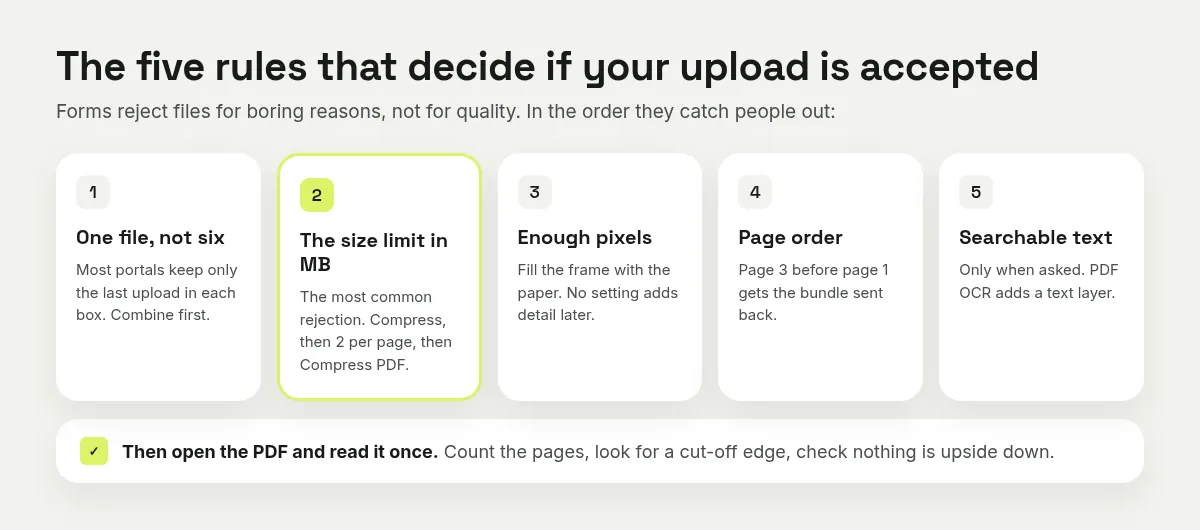
Then open the PDF and read it once. That last minute catches the most mistakes.
1. One file, not six
Most forms give you one upload box per document type. Six separate photos means six uploads, and plenty of portals only keep the last one.
So combine first, upload second. If you already made several PDFs, join them with Merge PDF rather than uploading them one by one.
2. Why is my PDF too big to upload?
This is the most common rejection. A modern phone photo is several megabytes on its own, so ten pages can pass most limits before you have even started.
Fix it in this order. Leave Compress images ticked. Then put 2 or 4 images on a page where that makes sense. If it is still too big, run the finished file through Compress PDF.
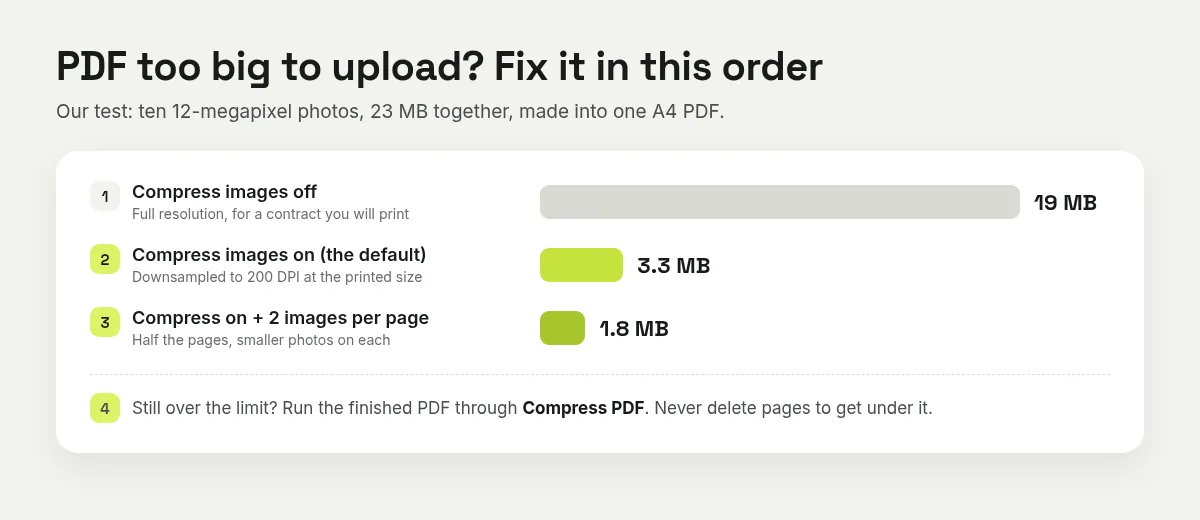
Our test with ten 12-megapixel photos. Your numbers will differ, but the order of the fixes holds.
Do not fix it by deleting pages. People do, and then the application is incomplete. For the limits email and chat apps set, see file size limits for email and apps.
3. Enough pixels on the page
Some forms ask for 200 or 300 DPI. DPI is just how many dots fit in an inch of the printed page, so it depends on how many pixels your photo gave that page.
The trick is simple: fill the frame with the paper. A page photographed from across the table has too few pixels, and no setting fixes that later. Get close, keep the phone flat, and leave a small border of table around the paper.
4. Page order, every time
An office that gets page 3 before page 1 sends the bundle back. Drag the rows before you convert, or tick Sort files by name before combining, since your camera names photos in the order you took them.
Page numbers are worth adding to anything longer than four pages. It costs one tick.
5. Text they can search, when asked
A PDF made from photos holds pictures, not text. Nobody can select or search a word in it.
Most forms do not care. Some employers, universities and legal portals do. Run the finished file through PDF OCR, which adds a text layer underneath the picture, so the page still looks the same and the words become searchable. To pull the words out of a single photo instead, see how to copy text from an image.
The check nobody does
Open the PDF and read it before you upload. Count the pages, look for a cut-off edge, and check nothing is upside down.
Thirty seconds there saves a week of waiting for a rejection email.
Why was my PDF rejected, or why does it look wrong?
Ten common cases. Nearly all of them are one setting or one retake.
What happened | Why | What to do |
|---|---|---|
The pages are in the wrong order | The files uploaded in a different order | Drag the rows, or tick Sort files by name |
The file is too big to upload | Compression is off, or the photos are large | Tick Compress images, use 2 per page, then Compress PDF |
Big white gaps around each photo | Page size is A4 and the photo is another shape | Switch to Fit to image, if the form allows it |
Landscape pages came out tiny | Orientation was forced to Portrait | Set Orientation to Auto |
The print looks blurry | Compression is on | Untick Compress images and convert again |
The pages are slanted | The photos were taken at an angle | Retake them flat, from directly above |
The edge of the page is cut off | The paper did not fit inside the frame | Step back a little and reshoot the whole page |
They asked for searchable text | The pages are pictures, not text | Run the PDF through PDF OCR |
Only some photos were added | More than 3 files at once without an account | Convert in groups of 3, or sign up free for 10 |
An iPhone photo would not upload elsewhere | It is a HEIC file | It works here as it is, or convert it with HEIC to JPG |
If the form still refuses the file and gives no reason, check the file name. Spaces, commas and non-English characters break some older portals.
Other free tools for the same job
Compress PDF shrinks the finished file when the form still says it is too big.
PDF OCR adds a text layer, so the words in your scan can be searched and copied.
Merge PDF joins several PDFs into the single file the form wants.
HEIC to JPG changes iPhone photos into JPGs for sites that refuse HEIC.
Get your documents uploaded today
To scan documents for an online form, read the form's rules, photograph each page flat, then put the photos through the free Convertavo JPG to PDF tool with A4 and a small margin. Open the finished PDF and read it once before you upload. That last minute catches more mistakes than anything else in this guide.
Frequently asked questions
How do I scan a document without a scanner?
Photograph each page with your phone, flat and from directly above, then turn the photos into one PDF. You do not need an app, and the whole job takes about five minutes.
How do I put several photos into one PDF?
Upload them together, drag them into the order you want, and convert. Each photo becomes one page. Without an account you can add 3 at a time, or 10 with a free account.
My PDF is too big for the form. What now?
Leave compression on, then put 2 or 4 images on a page where it makes sense. If it is still over the limit, run the finished PDF through a PDF compressor. Never delete pages to get under the size.
Can I put both sides of my ID card on one page?
Yes. Set Images per page to 2 and the front and back land on the same page, which is what most offices ask for.
Do iPhone photos work, or do I need to convert them first?
HEIC files work directly, so there is nothing to convert. If another site refuses them, change them to JPG first.
Will the form be able to search the text in my scan?
Not on its own, because the pages are pictures. Run the PDF through an OCR tool and it gains a text layer that can be searched and copied.
Try it on your own file
Free, no signup, and your file is deleted an hour later.
Noman Mustafa — Founder of Convertavo I build the file tools on this site. Fifteen years of writing software, and most of my days now go into making PDF, image and OCR processing fast enough to run in a browser tab. I write here about what I learn breaking files apart.